May 24, 2021
Adding Fire Control Systems to BF2
Modern weapons are capable of complex calculations, predicting where a fired projectile would land and showing it to the operator(CCIP) or allowing the operator to select the target and have the computer decide how to aim, compensating for gravity, movement speed and travel time. In Project Reality up until now, we “simulated” the existence of these systems by simply making projectiles fired from such weapons travel in a straight line. However in the last year we’ve been working on implementing a better FCS into the Battlefield 2 engine.
Reversing projectile physics
To be able to predict the impact point, we must use the same algorithm the engine applies on projectiles. There are a few variables to a projectile in the BF2 engine. Assuming we set them to what the game calls “Point Physics” these variables are gravity modifier (with 1.0 being 1.5g for some reason…), drag modifier and mass.
Using the game’s Python API, we are capable of recording the projectile’s position every game tick (30hz) and use this data as a baseline for the external simulation we created.
When setting a projectile’s drag to 0, the algorithm is simple: every frame, apply velocity to position, apply gravity to velocity (both multiplied by frametime). But we want to be able to use projectiles with drag in our systems, so it’s not enough.
Instead of trial and error, we open up IDA (and load up the Linux server binaries which have been compiled with ELF symbols) and look for the physics code itself. We find a function called PointPhysicsNode::updatePhysics, and after figuring out what each field and virtual function in the object stands for, we see a small section that is skipped when drag is set to 0.
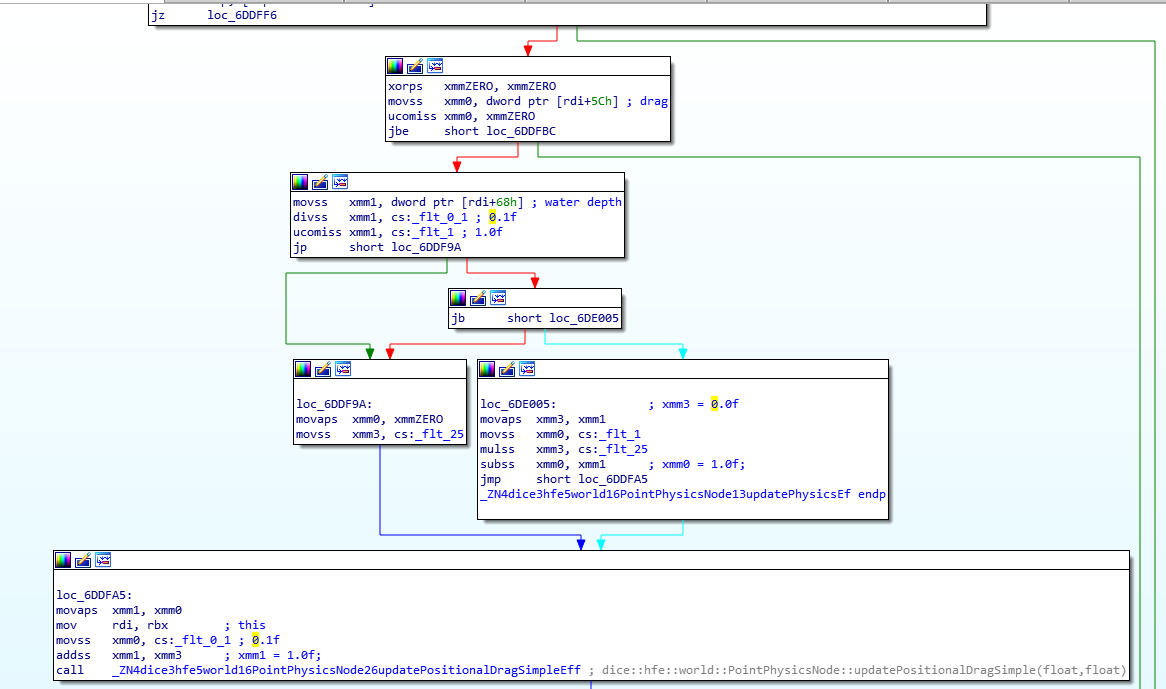 The section includes some logic for when the projectile is underwater, and a call to
 PointPhysicsNode::updatePositionalDragSimple(float,float). When the projectile isn’t underwater, the arguments are always 0.1f and 1.0f. In there we find the full drag algorithm
 Assuming wind is zero (It is an unused feature of the engine), the acceleration from drag is:
speed * pi * 0.1f * 0.1f * drag * (1/mass) m/s^2. (We assume that the developers decided to treat “Point Physics” objects as 0.1 meter radius spheres, and that’s how they decided the drag constants. There’s no other reason for pi to be involved here)
After adding the acceleration from drag to our external simulation we compare with the results from the game and saw that we’re getting matching results.
Heightmap
To see where the projectile lands we need to know where the “land” even is. A Heightmap is a large 2d array that defines the height of each point in the world, creating the terrain of the level. Along with the array itself, there are a few important settings for Heightmap in the engine: size, scale (stretching the heightmap) and bit resolution (size of one entry in the array)
heightmap.setSize 1025 1025
heightmap.setScale 4/0.000915527/4
heightmap.setBitResolution 16
heightmap.loadHeightData Levels/burning_sands/HeightmapPrimary.raw
After some reversing work we find where in memory the current level’s Heightmap class is, and in there a pointer to the Heightmap array and its settings. Using this we add a getHeight(float x,float z) function to our code, and update our projectile simulation to return the world coordinates where the projectile hits the ground.
Projecting onto screen using the HUD
We now have the 3D world coordinates where the projectile will land, and we want to project that point onto a pixel on the screen. We read from the game’s memory our “Camera” object’s transformation matrix, our FoV and use that to find the pixel on the HUD system (which is rendered at 800x600) that’s pointing towards that point.
BF2 engine allows you to define custom HUD elements. These elements are constructed once when the game launches, we brute-force scan for their vptrs once when the game launches and record the pointers for the relevant elements (which are defined by a unique string). This allows us to change their X/Y position on the screen at any time.
Selecting a fire angle
We can now fully simulate a projectile to see where it would land, but we want to do the reverse - we want to find the angle that would make the projectile hit a specific point selected by the player. The player will aim at a target and then hit a button to select the direction and range, the canon will rotate so firing a shot would hit the selected target.
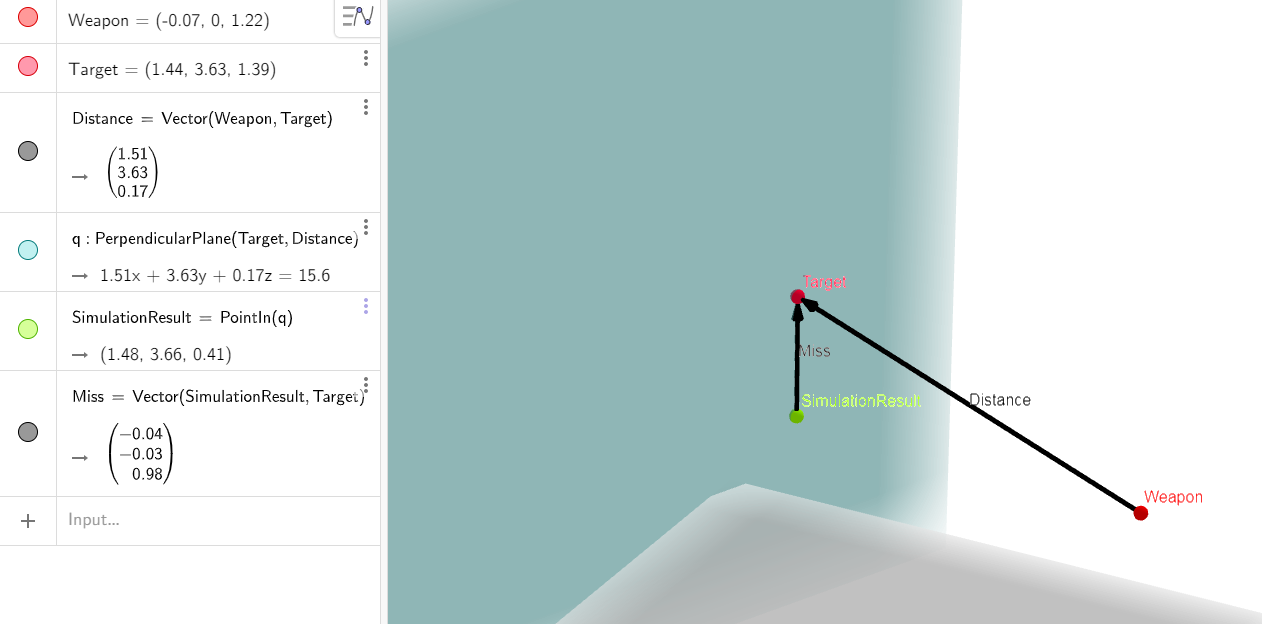
For this purpose, we will not be using Heightmap collision, as we know where the projectiles needs to land. First we define a plane on the target point, with its normal being the vector from the weapon to the point. Then we simulate a projectile using the current state of the vehicle (with no canon modifications) and see where it hits on this plane. In other words, we place a “screen” on the target and see how a projectile would miss it.
We simulate a projectile and calculate the miss. Based on the miss we decide how to adjust the aim. Initially, we used Gradient Descent (simulating 3 projectiles every step) to figure out in which direction to adjust the weapon, but this was needlessly excessive, as the projectiles in these systems are almost linear. Instead, we take the point on the plane where the simulated projectile landed and calculate the vector from that point to the target, call it “miss”. We then take this vector and rotate it to the weapon’s frame of reference. This gives us the direction for the step. The strength of the step is tan(miss / distance). We apply the change and simulate another projectile, seeing where it lands this time. In most use cases, one step is enough to reach 0.05m accuracy.
Applying the rotation is tricky. The weapons in question only rotate with a turret (yaw) and a barrel (pitch): The turret rotates around the UP axis of the turret, and the barrel around the RIGHT axis of the turret. This means that any rotation applied to the turret will change the barrel’s axis of rotation. The algorithm must take these into account when simulating changes to the barrel.
To summarize the algorithm:
- Initialize the selected turret/barrel (denoted X/Y) adjustments to 0
- iterate:
- Take the starting velocity vector (direction of the weapon * firevelocity), rotate it around the turret UP axis by X degrees
- Take the vector pointing RIGHT from the turret, rotate it around turret’s UP by X degrees
- Rotate the velocity vector (result of #1) with the new RIGHT (result of #2)
- Simulate the projectile with the velocity from #3 (optionally, add the shooter’s speed to compensate for moving objects), and see where it hits on the plane
- Calculate the miss between where it landed to where the target is
- If its very close to the target, abort and return X/Y
- Rotate #5 with the weapon’s rotation Matrix. (Now X is right, Y is up)
- Decide on a step size:
tan(miss / distance) - Normalize #7, multiply by #8 and add to (X/Y), continue loop